Tuesday, July 1, 2014

Personalized Tea Towels

I'm posting late because I had a busy weekend of errands, housecleaning, and Vacation Bible School decorating.
I want to share these fun tea towels I made. While shopping at Ross I found a set of 4 tea towels with a red stripe for only $2.99. I am all about a bargain!! I still had 2 red sheets of heat transfer vinyl (HTV) from a bundle pack I bought from Expressions Vinyl so I knew exactly what to do with them.
Thursday, June 26, 2014
Au Revoir Graphic Tee

One of the advantages of being crafty is that when I see something I like I can make it. And usually I can make it for a fraction of the price. As I took my daily stroll through the photos on People.com I saw this t-shirt worn by Kate Bekinsale and my daily mantra of "I can make that!" ran through my head. The shirt she has on is $78. I made mine for less than $5!
 |
| Source: People.com |
Wednesday, June 25, 2014
Wild Graphic Tanks

I recently worked on a tie-dye graphic shirt project for Rit Dye. I ended up with 6 designs but only needed 2. I loved all the designs so I am slowly using all of them on various projects.
I have a good blogger friend who volunteered to edit my wordier posts. As a thank you I created these shirts for 2 of his daughters. I let them pick the design and colors they liked best.
Monday, June 23, 2014
Kid's Art Display Center

My friend recently asked me to design an art display center for her boys. I came up with a couple projects and then some fun decorative pieces to help pull it all together. We went shopping at Michael's for all of the materials and then I had some very special helpers for the projects.

Friday, June 20, 2014
Painted Flag T-Shirt

I really wish I had a funny story or words of wisdom to add to this post. But I got nuthin'... SO you get boring old Cheryl.
This flag shirt came together in less than an hour which is my favorite kind of project. I wasn't going for precision. I wanted it to have a bit of a worn, rustic look. Probably because I was watching Junk Gypsies while making it!!
Materials: Cotton T-shirt // Rit Color Perfect Dye // Painter's Tape // Foam Stars
All the materials except the dye came from Michael's.

Thursday, June 19, 2014
Perfect Summer Tote

Meet my new love: Heat Transfer Vinyl (HTV). HTV may seem a little intimidating but, let me tell you, it's a cinch!
I worked with Expressions Vinyl to create this Perfect Summer Tote using the Pacific Ocean HTV Pack. It's the perfect mix of blues and just encompasses summer to me.
Materials: HTV Pack c/o Expressions Vinyl // Liquid Rit Dye in Lemon Yellow and Kelly Green // Canvas Tote via Michael's Stores.

Monday, June 16, 2014
Kids Craft: Red, White, & Blue Flower Headband

One of my favorite things to do with my nieces is crafts. It's a love we have in common and a special way to bond. We had a craft day while I was home visiting for Father's Day and made these adorable Red, White, & Blue Felt Flower Headbands.
As always, I try to keep my projects budget-friendly. We were able to make 4 headbands for less than $10.
Materials:
1 sheet each of red, white, and blue felt (only .29 cents at Michael's!!)
Clear Gemstones
Elastic Headband
Craft Glue
White Foam Sheet (Optional)
Friday, June 13, 2014
Reflect Your Style with One Kings Lane
 |
1. Line Mirror // 2. Preserved Hydrangea in Vase // 3. Gold-Plated Leaf & Aqua Quartz Necklace // 4. Decorative Geometric Glass Box // 5. Wooden Cottage Tray // 6. Nantucket Lanterns // 7.Ceramic Temple Jar // 8. Crystal Lotus Flower Bracelet
I get a lot of my inspiration for crafts and decorating by browsing online home and decor websites. One of my favorites is One Kings Lane so when they contacted me about participating in their Reflect Your Style campaign it was a no-brainer. I was in!
|
Wednesday, June 11, 2014
Silhouette Sketching

While I consider myself creative, I am not particularly artistic. My drawing abilities are along the lines of a preschooler. To have the ability to "draw" whatever I want using the Silhouette makes me supremely happy.
Monday, June 9, 2014
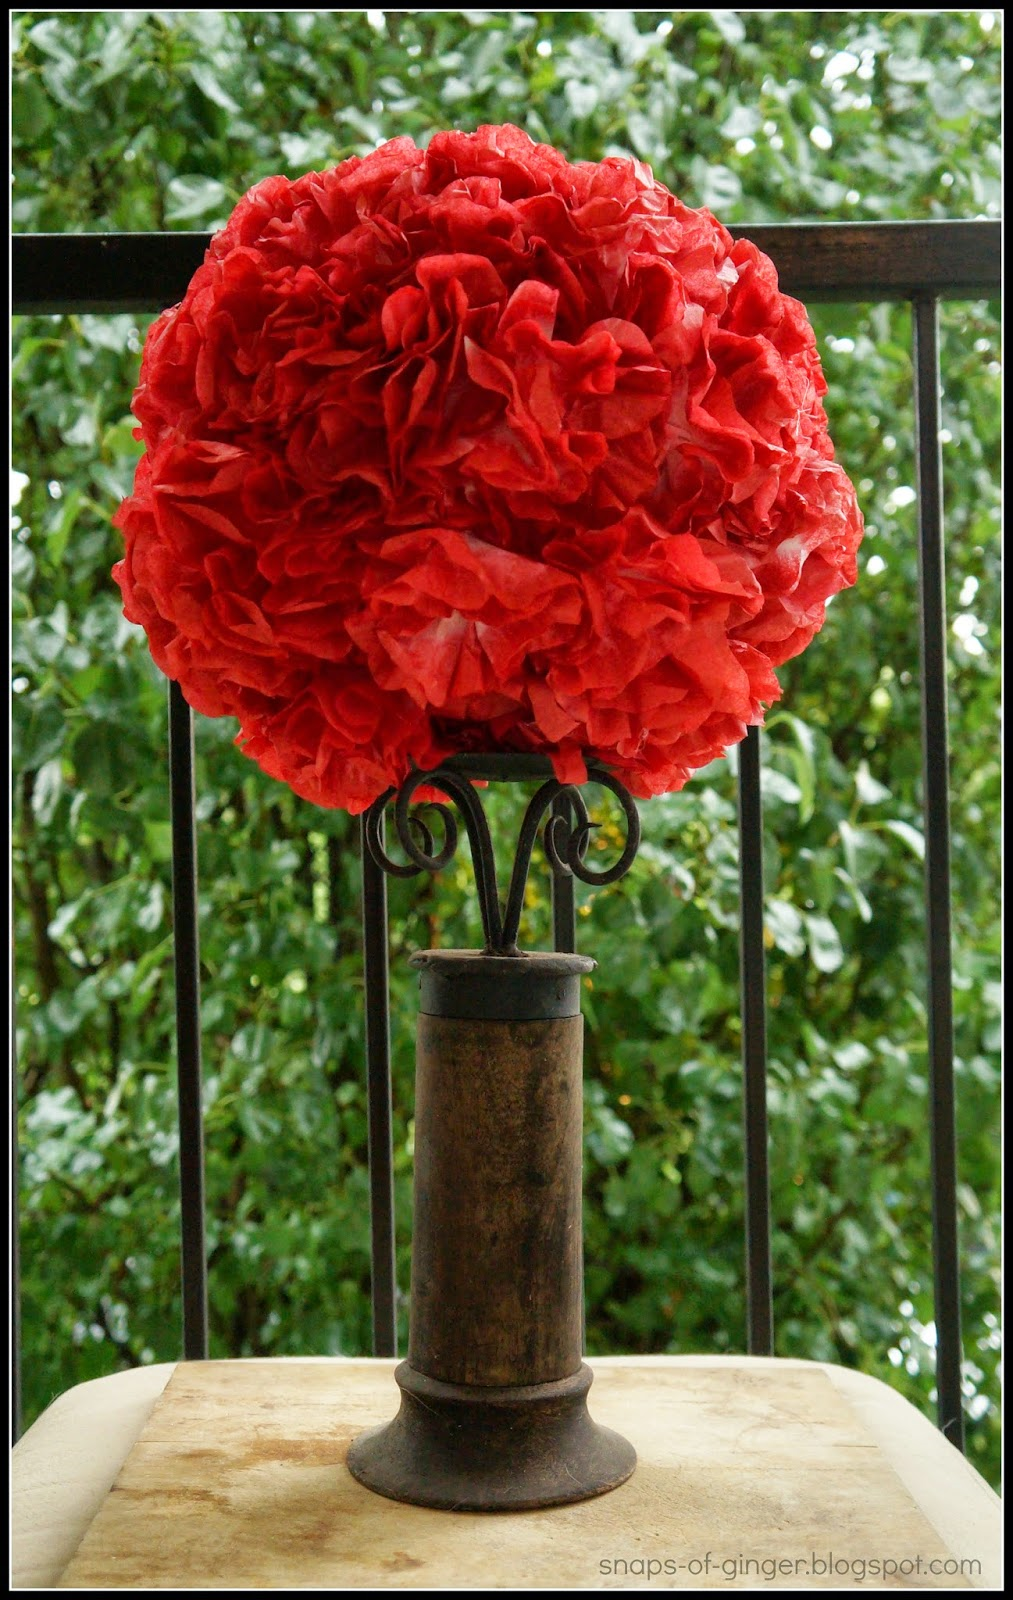
Coffee Filter Flower Topiary

Having a craft blog is expensive! I try to keep all of my projects budget-friendly but, even so, it still takes a big chunk of change to post 3 projects a week. This is why I love projects like this topiary. The entire project cost less than $10 to make. Really, probably less than $5 considering I could make multiple topiaries with the materials.
To make the ball I used coffee filters, liquid Rit Dye in Scarlet, a paper lantern, hot glue, and a stapler. The coffee filters and stapler are from Dollar Tree; the lantern and glue are from Michael's; and the dye is c/o Rit Dye.
First, I dyed the filters. This is a super-easy process. I mixed 1/8 cup of liquid dye with 1 cup hot water in a small container. Next, I folded the filters into quarters and dip-dyed them. I did bunches of 10 or so and line-dried them in my shower overnight. I ended up using almost 150 filters.

Friday, June 6, 2014
Wrapped Bangle Bracelets

These bangles are so easy to make. All I needed were bangles (you can use any size and type), embroidery thread (which I already had in my stash from Michael's), and craft glue. And of course a good movie to watch while you make them!

Wednesday, June 4, 2014
Mixed-Media Collage & Embellished Candle
But that just goes to show how quickly a project like this can be put together. From start to finish, both pieces were done in an hour.

First, I glued the doily on the panel. Then I used my Silhouette Cameo to cut a simple label shape out of card stock and added the stamp in the center. Next, I glued on the two keys. I used Weldbond glue for all of this since it works on all mediums.

Sunday, June 1, 2014
White-Washed Memo Board

My weekend was full of projects. Some were a success and some weren't (yet!!) This project I consider a success.
This is a simple project with big results. I created a shabby-chic display to organize all those little notes and receipts we all have lying around. Also perfect for displaying photos or cards!
I was originally going to use chalk paint on the board, but after seeing a project by Gina at Shabby Creek Cottage, I decided to try white-wash instead.


Friday, May 30, 2014
No-Sew T-Shirt Necklace and Pin

Clutter. I can't stand it! My house is fairly clutter-free except in two areas: My shoes and my craft supplies. The shoes? There's no help for that. I am a woman who loves her shoes!
The crafts? That I can tackle. While I organized, I noticed how many scraps of this and that I had around. I hated the thought of throwing them away so I found a way to use them instead.
To make the necklace I used a t-shirt. I laid it flat, then folded it in half longways. This made it easier to cut strips across the trunk section of the shirt. I continued to cut strips all the way up to the sleeves. I didn't worry about making even, clean cuts since the edges would not show in the end.

Wednesday, May 28, 2014
Tie-Dyed Graphic Tees

I decided to make a couple t-shirts myself. This way I could customize the entire process from the color of the shirt and tie-dye method, all the way through to the design. And it was much more budget-friendly this way too!
To see the full tutorial, go to my Rit Studio page here.
**This post was sponsored by Rit Dye**
Linking up with:


Monday, May 26, 2014
Enjoying the Ride (and Photobombing)

Enjoy the ride. We hear that a lot, but what does it mean?
What is the ride? I see it as our journey through life. We maneuver through the twists and bumps along the path. For some, it's straight and even. For others, it's a roller coaster of ups and downs. For most, it's a combination.
But, do we enjoy it? Do we savor the journey? Do we appreciate our spot on the map right now, or do we crane our necks to see around the next turn?
Friday, May 23, 2014
Easy Burlap & Seashell Vase

It has been a busy May for me. I have traveled the last two weekends so I'm looking forward to a quiet long Memorial Day weekend at home. I have some cleaning and crafting planned and a lot of couch sitting and movie watching. I am ready to chill!
Since I'm already in chill mode I wanted to share this super-simple project. I love keeping fresh flowers in my house. They just make it feel happy and cheerful. I stopped by Publix on the way home and grabbed this simple bouquet.
Tuesday, May 20, 2014
Dad, Daddy, Father, Pop - This is for you.

Not in occupation. Some are story-tellers; some work with their hands; some mold lives as teachers.
Not in recreation. Some coach sports; some create; some fish.
Not in life. Some are single-parents; some struggle just to make ends meet; some have the house with a white-picket fence and two-car garage.
Kendra's Miami Fashion Challenge - South Beach Day to Night
I was recently contacted by Kendra Thorton, a well-know travel expert, and asked to participate in her Miami Fashion Challenge. Here are a few words from Kendra about the challenge:
"I'm creating a fashion challenge for bloggers! I'm going with my husband to South Florida. We planned our vacation on gogobot, which helped us find the perfect hotel and gave us several ideas for where to go while we're exploring the area. I love South Beach. It looks like a paradise but with a lot of art, history, culture and of course, fashion. If you could help me pick out some outfits for my trip, I would be so grateful. These details provide a better idea of what we'll be getting into during our stay.


"I'm creating a fashion challenge for bloggers! I'm going with my husband to South Florida. We planned our vacation on gogobot, which helped us find the perfect hotel and gave us several ideas for where to go while we're exploring the area. I love South Beach. It looks like a paradise but with a lot of art, history, culture and of course, fashion. If you could help me pick out some outfits for my trip, I would be so grateful. These details provide a better idea of what we'll be getting into during our stay.
There are a variety of hotels in South Beach that looked absolutely stunning, but one really stood out to us. The Delano South Beach Hotel is known for its posh exterior and luxurious suites. From the plushly decorated rooms to thespa on the roof, I fell in love the moment I Saw this hotel and knew that it was the right place to spend our romantic getaway. My husband thought so too. He even splurged on a spa day for me at the hotel's spa Club Essentia.
I'm thrilled to be going to South Beach. I plan on getting some rest and relaxation at the beach and spa before heading out to explore all of the different parks and gourmet restaurants that are located right on the beach. While we are going around Miami, I would love some posh yet casual outfits that make me feel comfortable no matter what we're doing. We'll also spend a lot of time at the beach and maybe even take a boat out to visit some of the islands around the bay. I can't wait to see all of the fashion finds that you select. As a mother of three, I think my wardrobe needs a serious upgrade for this trip..."
I deciced to create an outfit for Kendra that would go from day to night. After all, a vacation should be about things being simple and easy! The day portion of the outfit is perfect for sightseeing and shopping, while the night portion is dinner and dancing ready.
I deciced to create an outfit for Kendra that would go from day to night. After all, a vacation should be about things being simple and easy! The day portion of the outfit is perfect for sightseeing and shopping, while the night portion is dinner and dancing ready.


Monday, May 19, 2014
Tiny Dancers, Twirlers, and Flower Cupcakes

Scene 1:
My older niece's dance recital was today. My younger niece and other family members and friends filled the row. We waited for my niece to take the stage.
I sat in a sea of moms, dads, grandparents, siblings, and friends. I knew when she stepped out on stage, everyone would disappear but her. I'd wait breathlessly through pirouettes and leaps. My heart would swell with each step of her dances.
She wouldn't see us, although her eyes would scan the audience. She knows we're there. That's enough.
Scene 2:
Friday, May 16, 2014
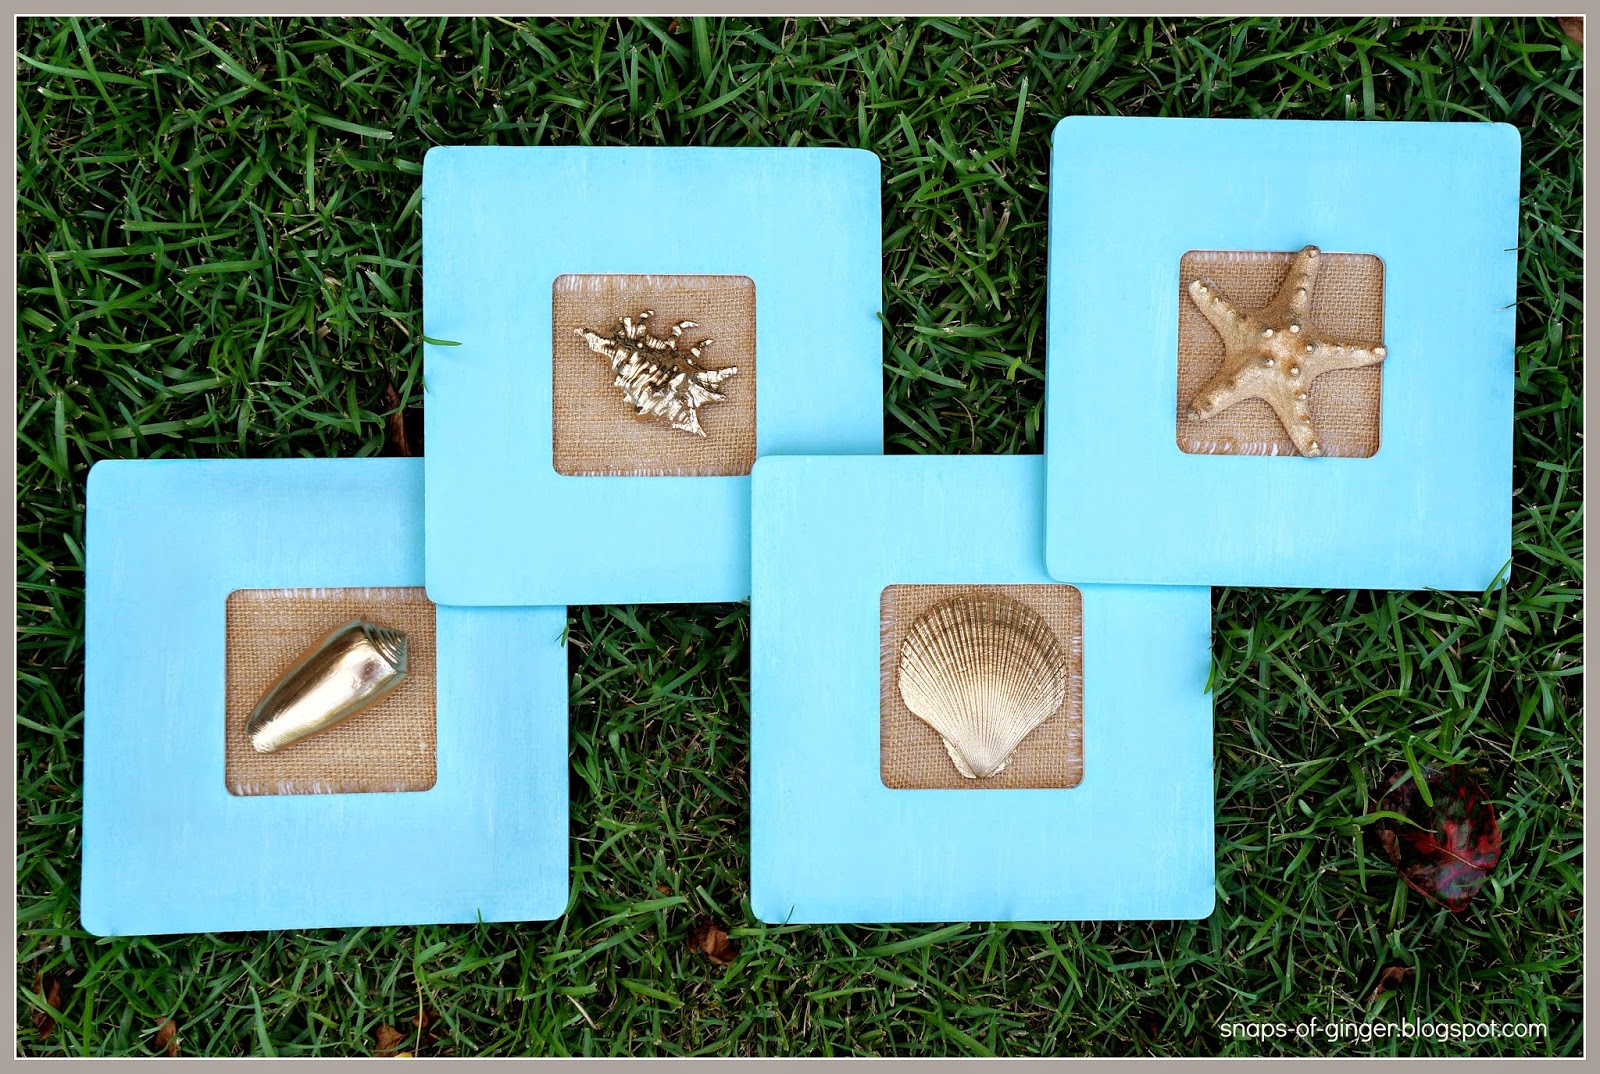
Gold Leaf Seashell Wall Art

For this project I used 4 wood frames, FolkArt craft paint in Sky Blue, Recollections Burlap Ribbon, Plaid Liquid Leaf in Gold, and assorted seashells.
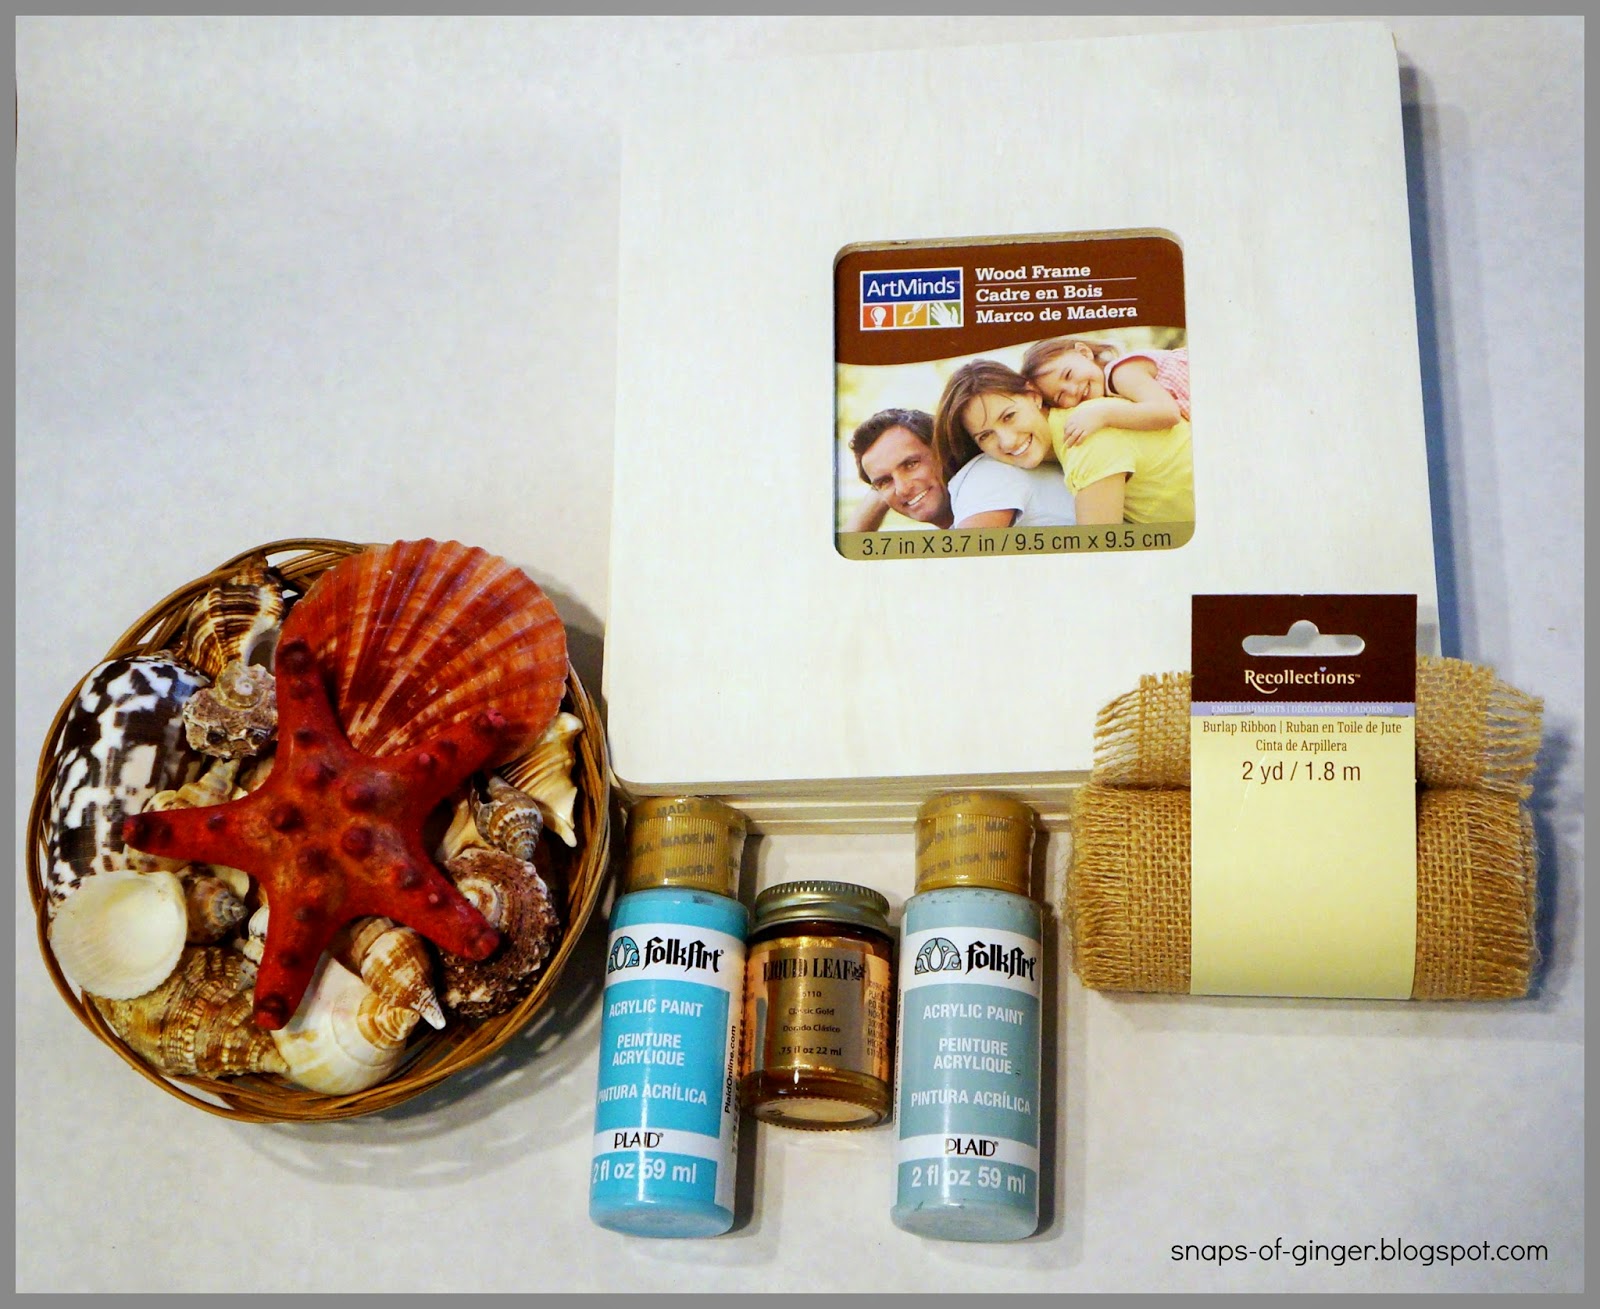
First I painted the frames. I was going to add in another shade of blue but really fell in love with the beachy feel of the Sky Blue.

While the frames were drying, I used a stiff brush to paint the Liquid Leaf on the shells. It covered easily and quickly. It completely transformed the shells. I found this whole set of shells at CVS for only $2.00. A major score!

Next, I measured the burlap using the frame backing, cut it, and hot glued it to the white side of the cardboard. Then I inserted the backing into the frame.

Next, I glued a shell inside each frame. And finally, I glued the frames together.
Linking up with:

Subscribe to:
Posts (Atom)